saved by the bell

     
    this old thing! got it on ebay for like, $40 a couple of years ago....every so often i see its itchy beige fabric poking out from the depths of my closet, and i feel the urge to wear it for a few short hours until i can stand the itch no longer. but i enjoy every scratchy moment. like this day.
    dress: vintage, boots: barney's co-op, leather necklace: cynthia duggan, plate necklace: katie costello, bangles: f21, egyptian knuckle ring: alkemie

Post Title

saved by the bell


Post URL

http://charlotte-lifesaboutthejourney.blogspot.com/2010/11/saved-by-bell.html


Visit Charlotte Lifes About The Journey for Daily Updated Wedding Dresses Collection

20% off Anything at Made by Girl...(Via Made By Girl)


    SALE starts right now. Visit MadeByGirl to shop.
    If you have any questions, email me at jen(at)madebygirl.com

Post Title

20% off Anything at Made by Girl...(Via Made By Girl)


Post URL

http://charlotte-lifesaboutthejourney.blogspot.com/2010/11/20-off-anything-at-made-by-girlvia-made.html


Visit Charlotte Lifes About The Journey for Daily Updated Wedding Dresses Collection

Glimpse into My Thanksgiving Weekend Trip...(Via Made by Girl)

    Isn't it FRUSTRATING trying to get into the swing of things after getting back from a Holiday trip?!? I've got a TON of emails to catch up on amongst other things & all I want is to be outside in the sun (even if it is cold). 

    Well, for those of you who weren't aware, my guy SURPRISED ME with a Thanksgiving wknd. getaway to California. He planned the whole trip, every single stop! 

    He knew I was dying to visit the Getty as well as the MOCA and he took me straight there! It was such an amazing experience to be around all these great paintings. Of course.... I LITERALLY got goose bumps when I came across Mark Rothko & Franz Kline (2 of my all time faves). 

    above: A Franz Kline original painting....I was mesmerized.


    below: the delicious carrot cake we bought at the Getty cafe


    These 2 paintings of Jesus were especially touching...


    Below: I was so excited when I got to the area where the HUGE Mark Rothko paintings hung, wow.


    Below: don't ask, I totally forgot who did this....
    P.S. it's by Cy Twombly, thanks to Devon.


    below: the Getty had several outdoor areas with SPECTACULAR views of the city, my jaw dropped when I first saw this. Trust me, this picture doesn't do it justice!


    Besides paintings, they also had a ton of sculptures and old European decor items.


    I'm so grateful that I got my dose of culture because LV is seriously LACKING in that department! Have you visited the Getty or MOCA? What museum would you recommend??


    We also headed to Palm Springs to see the Elvis Honeymoon Hideaway.  After seeing it featured in Rue Magazine, (I expressed my interest in going) my guy decided to take me there! 


    Stay tuned for those pics soon! 

Post Title

Glimpse into My Thanksgiving Weekend Trip...(Via Made by Girl)


Post URL

http://charlotte-lifesaboutthejourney.blogspot.com/2010/11/glimpse-into-my-thanksgiving-weekend.html


Visit Charlotte Lifes About The Journey for Daily Updated Wedding Dresses Collection

Opelle Giveaway!

    Opelle
    It seems that for every giveaway I post, I long to be a reader and not the blog author, just to have the chance to win!!! Again, I find myself green with envy that one of my incredibly lucky readers will get to call this stunning Opelle warmed silver leather wristlet their very own! Amy's handmade bags make me swoon with delight and I know I won't be alone in admiring their exquisite designs.
    Sewn of the softest lambskin leather in a rich shade of metallic silver, it is a unique and easy accessory.
    To Enter- visit the shop and leave a comment:
    1) with your favorite item from Opelle
    2) leave a way for me to contact you

    Open to all readers. Contest ends December 6th at 11pm est.
    ...
    I apologize for the holiday delay...chosen by random.org, the winner of the Archives vintage scarf is Laura, of Sweeter Salt. A big hearty thank you to my lovely sponsor Lisa and thanks so much to everyone that entered!

    Holiday look no.2 tomorrow!

    Yours,
    Maria Sig 2

Post Title

Opelle Giveaway!


Post URL

http://charlotte-lifesaboutthejourney.blogspot.com/2010/11/opelle-giveaway.html


Visit Charlotte Lifes About The Journey for Daily Updated Wedding Dresses Collection

Guest Post: SusannahBean DIY Retro Foil Wreath!

    metallic diy wreath


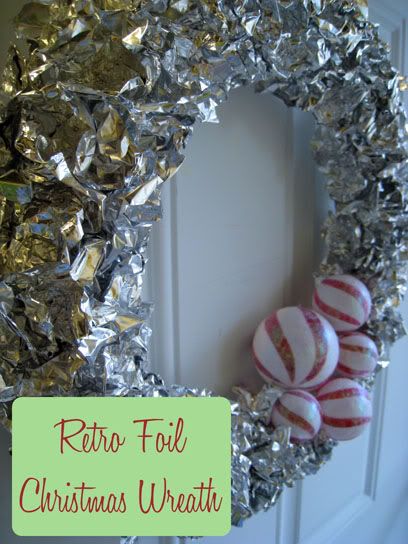
    I have a soft spot for cheesy Christmas decorations. I love tinsel and candy canes and elves, and if it looks like it came from the 1950s I’m all over it. That’s where the idea for this wreath came from. I wanted something with 50s style but a modern twist, and I wanted to reuse things I already had laying around my house. Thank you, Kaelah, for letting me share this with your readers!!
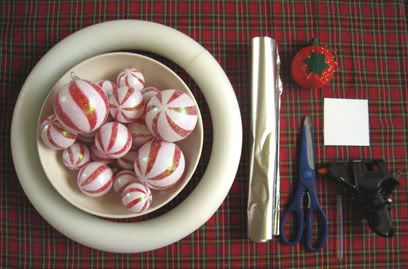


    What you'll need:

    • One large (14”) Styrofoam wreath
    • One pack of ornaments (feel free to use any assortment of ornaments you have. It looks best if you have
    • different sizes)
    • One roll heavy duty tinfoil
    • Pins
    • Kitchen shears (or scissors, but they’ll need to be strong)
    • 3”x 3” square of cardstock (for a template, use any thick paper or cardboard)
    • Hot glue gun and glue sticks
    • (Optional): One 5-6” length of coordinating ribbon to use as a hanger, OR an over the door wreath hanger


    Instructions:

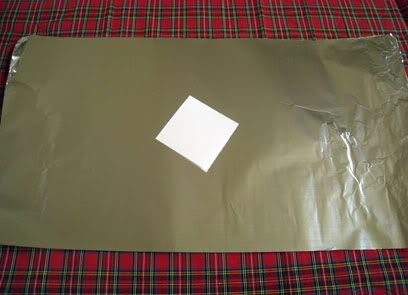
    Tear off a length of foil and fold it in half as many times as needed until you get a square pretty close in size to your template. It’s much quicker to cut the foil like this, that way you end up with a lot of squares!


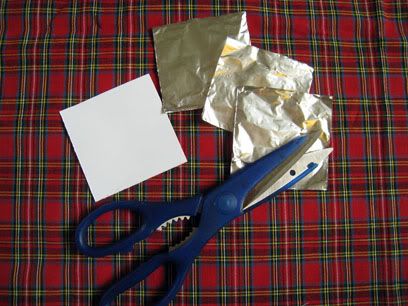
    You’ll want to separate the individual squares. Don’t worry if they tear a little bit, or if they aren’t perfect
    squares. You’re just going to crumple them up anyway!

    Take one square of tinfoil and wrap it loosely around the tip of your finger. Twist the center part of the square around and fold it back on itself. You need to make it thicker at the middle so it won’t rip when you pin it to your wreath, so as long as you can make a little thick spot you’re doing good!


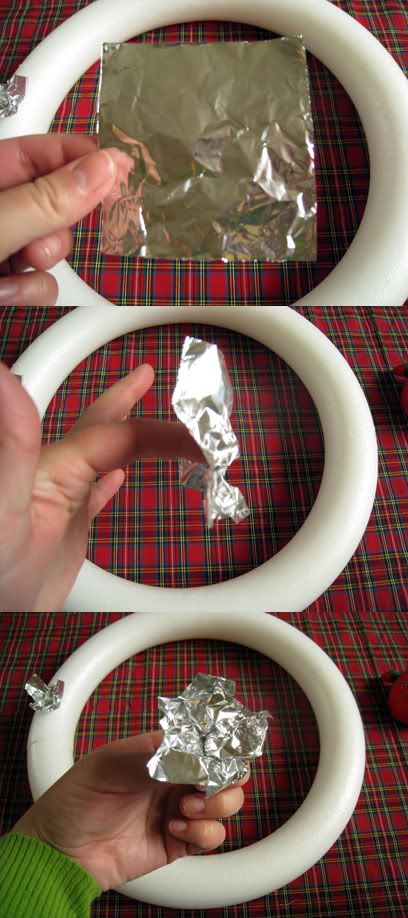
    Insert a pin through the thick spot on your foil square.


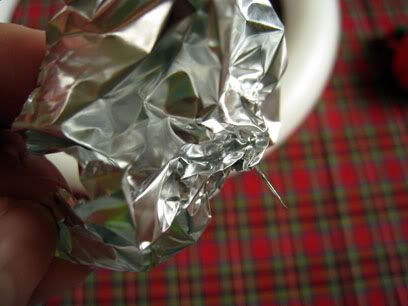
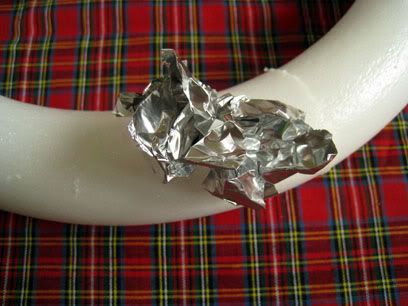
    Then insert the pin into your wreath. Crumple the foil a little, but not too much. Once you get going this won’t matter as much. You want to have each piece standing up as opposed to flattened out. Continue to pin down more foil squares, making sure you’re covering the Styrofoam so that no white shows through.
    You don’t need to do the back half of your wreath because you want it to lay flat against your door, so just pin the foil to the top half of your wreath.


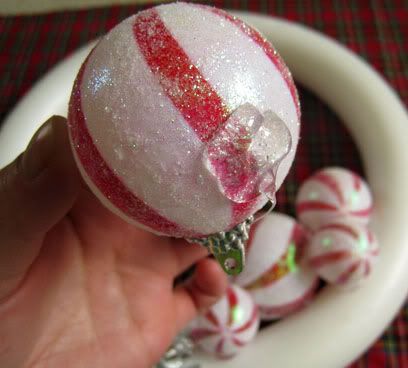
    After you’ve done a little patch of foil leaves you’ll add your ornaments. Try out an arrangement before you glue it together. It helps to start with the biggest ornament and fill the little ones in around it. Once you’ve settled on an arrangement, glue them down with your hot glue gun. Use lots of glue, you want it to be secure!


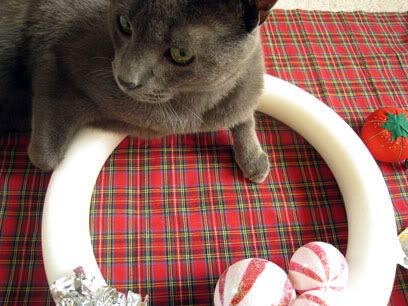
    Get an assistant if you need to (my kitty Mr. Littlejeans tried to help, but it wasn’t working out, so I enlisted my boyfriend Chris!).


    Keep cutting and folding the little squares and pinning them to your wreath. You’ll need quite a few to cover it, so just keep going until it’s completely covered!

    Crumple the foil in a way that will cover the white around your ornaments. If you’ve glued your ornaments close enough together, you should not need to pin any foil in between them.


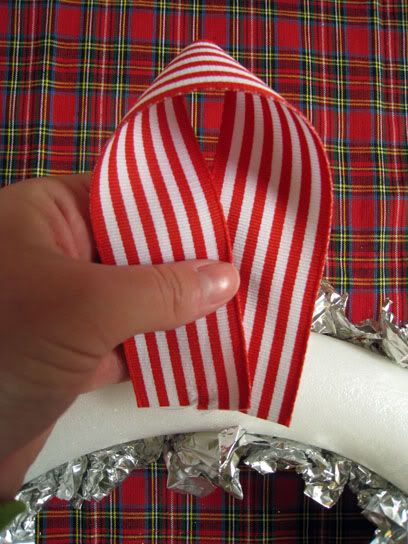
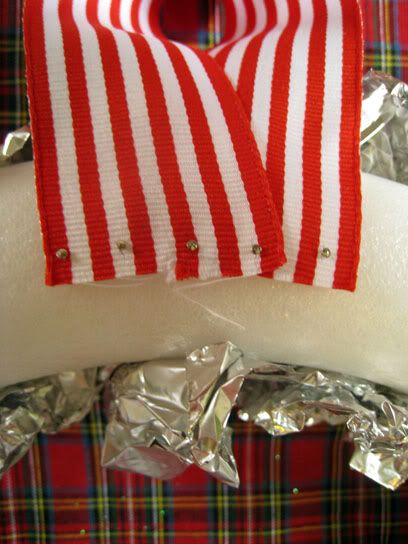
    Once your wreath is covered in foil, you’re pretty much done! If you need to use a length of ribbon for your hanger, fold it as I’ve done in the picture below and pin it in place.


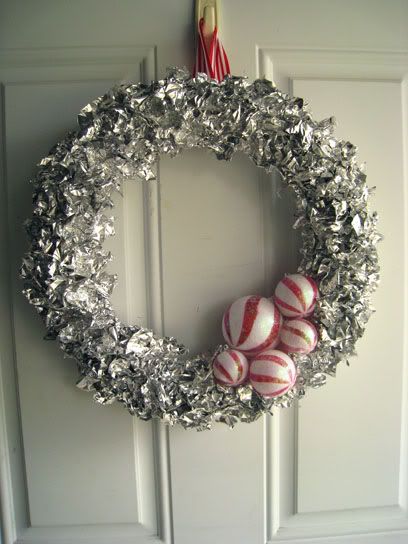
    Hang your pretty retro wreath on your door and enjoy! All in all, I spent $9 on this little beauty, $5 for the wreath and $4 for the ornaments. It’s a cute way to add Christmas cheer to your house when you’re on a budget! If you make one of your own foil wreaths, I’d love to see it! Leave me a link to it on my blog at susannahbean.com so I can check it out! Happy Holidays!!

    ---------------------------------------------------

    Be sure to drop by Susannah's blog and say hello! A huge thank you for the ultra rad and shiny holiday decor! I hope you're into DIY Week as much as I am! There's more where this is coming from! xo

Post Title

Guest Post: SusannahBean DIY Retro Foil Wreath!


Post URL

http://charlotte-lifesaboutthejourney.blogspot.com/2010/11/guest-post-susannahbean-diy-retro-foil.html


Visit Charlotte Lifes About The Journey for Daily Updated Wedding Dresses Collection

Guest Post: LindsayHarmony DIY Felt Penguin Ornament!


    Hello everyone! I just got my Christmas tree a couple of days ago, and I don’t know about you guys but I love handmade Christmas ornaments! They don’t have to be too complicated either, here’s a tutorial for an easy and fun penguin ornament made of felt and some fabric scraps.

    Here’s what you’ll need:

    felt and fabric penguin christmas ornament diy

    Some felt in a few different colors (one main color for the body plus a few scraps for the beak and bow tie), some fabric scraps, buttons, some ribbon or rick-rack, a needle and thread, some glue, and optional polyester fiber-fill (or other stuffing material).


    First, print and cut out the pattern pieces attached, then trace and cut out all your pieces. Part A will be cut from your main color of felt twice, this will be the front and back of the penguin. Part B will be cut from your fabric scraps, this will be the belly. And the bow tie and beak can be cut from other scraps of felt.


    Next, you’re going to want to sew or glue the belly piece onto one of your pieces of felt. Line the bottoms of the pieces up. If you’re choosing to sew it on, you only need to sew the arch part, as the bottom will get sewed together later when you sew the back and front together.

    felt and fabric penguin christmas ornament diy

    Next come the eyes, you can again either sew or glue on the buttons. Then glue on the beak and bow tie. I prefer to glue these rather than sew because they’re so tiny. If you’re using tacky glue, don’t worry about getting any on the felt, it will dry clear!

    felt and fabric penguin christmas ornament diy

    Now you have the front of the penguin done! If you wanted to make this a no-sew project, you could easily glue on some ribbon to the top of the penguin and he’d be all ready to hang. But if you’d like to stuff the penguin, it’s time to stitch him all together! We’re going to stitch this front piece to the other piece of felt you’ve cut out. Lay the front piece on top of the back, and start to sew a running stitch all around the edges.

    felt and fabric penguin christmas ornament diy

    Once you get to the top, fold a piece of ribbon or rick-rack and lay it in between the front and back of the penguin. Sew over this to secure it.

    felt and fabric penguin christmas ornament diy
    felt and fabric penguin christmas ornament diy

    Continue sewing all the way around, until you have about 2 inches left to sew. Stuff the penguin as little or as much as you’d like. I personally like mine a little plump =]

    felt and fabric penguin christmas ornament diy

    Finish off the stitching with a knot and you’re all done!

    felt and fabric penguin christmas ornament diy

    I love to make these little penguins in all kinds of color + fabric combinations. They make great gifts and look perfect on any tree!

    Happy crafting!

    -Lindsay

    -------------------------------------------------------------

    Be sure to stop by Lindsay's etsy shop to see her cute little pieces of felty-goodness! (The shark is my favorite! Followed close behind by the Sweet Autumn headband!) Thanks Lindsay! Stay tuned for a magical metallic foil wreath by SusannahBean coming up later today!

Post Title

Guest Post: LindsayHarmony DIY Felt Penguin Ornament!


Post URL

http://charlotte-lifesaboutthejourney.blogspot.com/2010/11/guest-post-lindsayharmony-diy-felt.html


Visit Charlotte Lifes About The Journey for Daily Updated Wedding Dresses Collection

Popular Posts

My Blog List

Blog Archive